
Declared IDs
06 Oct 2019 » AAM
In my previous post, I started explaining what profile merge rules are. If you were expecting that in today’s post I documented how to configure it, I am still not there yet. I still need another building block: the declared IDs. With it, I will be in a position to show you how to proceed with profile merge rules.
What are declared IDs?
Adobe Audience Manager relies on the UUID stored in the demdex cookie or the ECID (more details in my post about visitor identification). Since both are related, only one is needed. However, as I have explained a few times, this identification is at device level. Well, in fact, it is at browser level.
In order to be able to play with profile merge rules, we need to send the CRM ID or customer ID to AAM. In the AAM, these IDs are called declared IDs, to make them more generic. It can be anything that uniquely identifies the user whenever he/she logs in. And it has to be always the same for the same customer, across browsers, sessions and devices. Otherwise, it will be impossible to combine multiple devices or browsers into a single profile.
Data Sources
Before you start sending declared IDs to AAM to be used in conjunction with profile merge rules, you need to tell it that you are going to do so. As non-intuitive as it may seem, you do it through data sources. You should see data sources as both a means to send data to AAM and a storage of declared IDs. In fact, if you think about it, it makes some sense. If you are going to also send offline data keyed off a declared ID, you need to store it somewhere.
In AAM, go to “Audience Data” > “Data Sources” and click on “Add new”. This will take you to the new data source form:
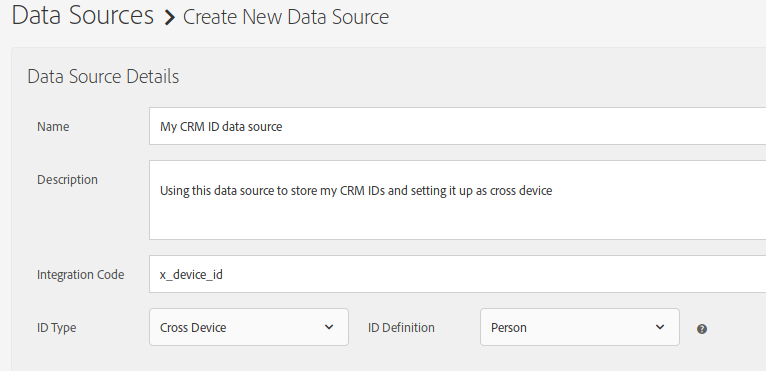
- Name: give it a meaningful name
- Description: a longer text, explaining what this data source is about (optional)
- Integration code: set it to a unique value across all your data sources; I have not been able to find the restrictions, but to be on the safe side, use only alphanumeric characters and the underscore (_), excluding spaces.
- ID type: “Cross Device”
- ID definition: “Person”
If you are going to also send offline data, you will need to configure it here too:
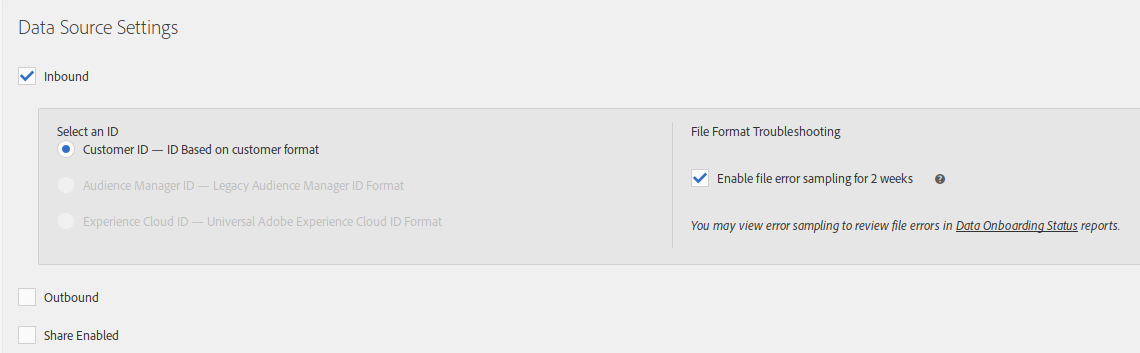
- Inbound: enabled
- Select an ID: since this is a cross device data source, the only option is “Customer ID”, which makes sense anyway and this is what we have been talking all along the previous and this post
- Enable file error sampling for 2 weeks: optional, but useful to check that you are sending the file with the correct format and data
The documentation for sending offline data can be found in the Sending Audience Data help section. I may write about it in the future.
Finally, click on “Save”.
Sending declared IDs
By now, you have AAM configured to start receiving declared IDs. The next step is to change your website implementation to send them. One important detail is that you need to send the declared ID on every call to Analytics, Audiences Manager or Target, while the user is logged in. This means that you need to persist somehow your CRM ID from the moment the user logs in until the user logs out. Audience Manager will not persist if for you. The moment it sees no more declared IDs, it will assume the user has logged out.
You may be wondering… why have I mentioned Analytics or Target? Well, in most implementations, the data to Audience Manager comes from Analytics, including declared IDs. In the case of Target, it can use Audience Manager segments, for which it also needs the declared ID (more info: Share Audience Manager Segments in Adobe Target). This is the beauty of the integration between these three solutions.
Launch, by Adobe
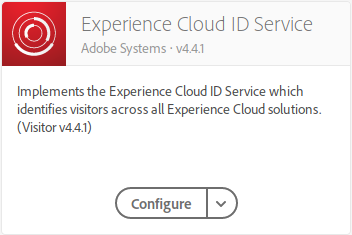
In Launch, the process could not be easier. I assume that you have already enabled and configured the extension for Experience Cloud ID Service:
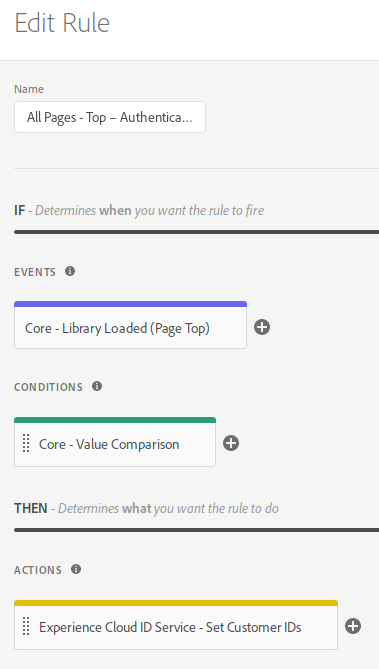
Next, you create a rule with the following configuration:
- Events: Library Loaded (Page Top)
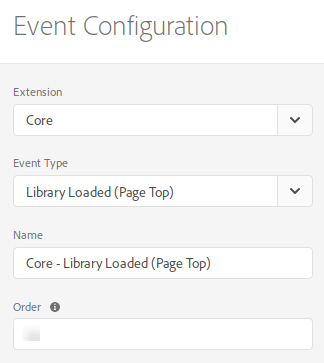
- Conditions: configure it to check that the user is logged in; this will depend on your particular implementation, but, typically, you would check that the data element where you expose the CRM ID has a non-empty value
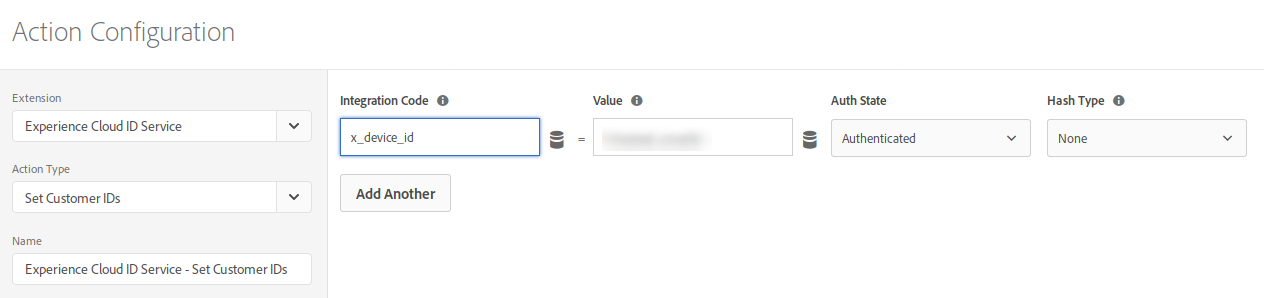
- Actions: Set Customer ID
where:</p>- Integration Code: set to the value of the AAM data source integration code
- Value: use the data element where you are exposing the CRM ID
- Auth State: “Authenticated”
- Hash Type: “None”
So, your rule will look something like:
JavaScript code
If you are not using Launch or your TMS does not offer a UI to set the declared ID, you will need to set the value in code using the setCustomerIDs method:
visitor.setCustomerIDs({
    "x_device_id":{
        "id":<CRM ID>,
        "authState":Visitor.AuthState.AUTHENTICATED
    }
});
I assume that the Visitor instance is named visitor. The key of the JSON key is the integration code, "x_device_id" in our example. You need to replace <CRM ID> with the real value; for example, in the previous post, this would be "1a2b3c4d". Remember to do it at the top of the page, soon after loading the VisitorAPI.js code.
Note on lazy loading
The last sentence of the previous section is more important than what you think. The CRM ID must be available at the beginning of the page. Otherwise, Adobe Target will not be able to use it and your personalisation activities based on CRM data will never show up.
However, many frontend developers tend to lazy load as much information as possible. So, the clash is inevitable: marketers need it at the top of the page, developers say it is a lot of effort for them. Unfortunately, there is no compromise. You have two choices:
- Load the CRM ID late and do forget about many personalisation activities
- Load the CRM ID at the top and do all your personalisation activities
To me, only the second option is acceptable. It may take longer for the developer to do it, but there is no alternative. The sooner this issue is raised in the development of the website, the better, as it is easier to fix it at the beginning of the project.
Mobile
As usual, mobile versions of the SDK have similar methods. As there are many of them, I will just list them with links to the documentation. If you have followed the previous explanation, you should immediately understand how to use them.
- Adobe Experience Cloud SDK 4.x
- Android: Visitor.syncIdentifier() or Visitor.syncIdentifiers()
- iOS: visitorSyncIdentifiers or any of the related methods
- Adobe Experience Platform SDK: use the method that best suits you from sync identifiers
Always use a method where you can set the authenticated state.
Pixels
It is sometimes the case where you cannot run any JavaScript or have limitations with it, but you can put a pixel. This is usually the case of third party websites. In general, in this situation, you do not have access to the CRM ID. However, there may be some cases where you have it or the website where you insert the pixel will have this CRM ID. In this case, you can add the declared ID to the URL of the pixel as a key/value pair:
- key: d_cid_id
- value: <integration code>%01<CRM ID>
For example, using the declared ID we are using in this post:
https://<partner>.demdex.net/event?d_cid_ic=x_device_id%01a1b2c3d4&key1=value1&key2=value2&...
Here you have the full documentation of these pixels.
Debugging declared IDs
Adobe Analytics
As I said above, this is now the standard process to send data to Audience Manager. If you have correctly set Analytics and the ECID up, the call should look like:
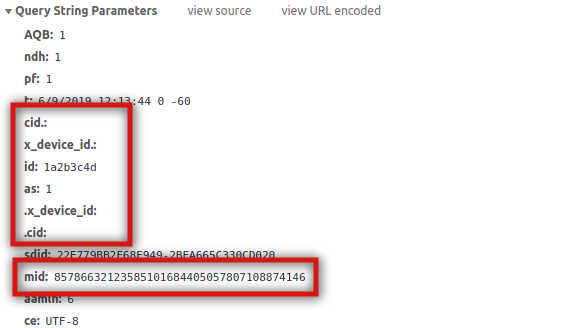
You will notice that the declared ID is between cid. and .cid. In case you are wondering, as stands for “Authenticated State” and Visitor.AuthState.AUTHENTICATED is actually a 1. It is also very important to notice that the mid is still present. In other words, while logged in, you should see both the ECID and the declared ID in all calls. AAM needs both.
Adobe Target
As mentioned above, Target can also use the declared ID to query Audience Manager for segments. It will do so through a server-side call passing the ECID and, if present, the declared IDs. Similarly to Analytics, these parameters are included in the call if it all has been correctly set up:
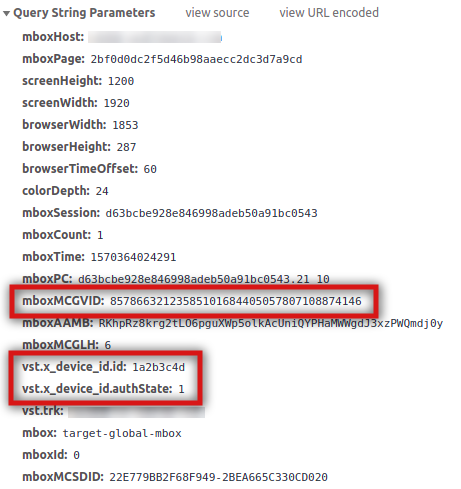
The parameter names are different, but the values and the concepts are the same. The ECID is sent in mboxMCGVID and the declared ID integration code and authenticated state have a prefix of vst..
Calls to demdex
This will be the case of either using the DIL code (which has become very rare) or simple pixels.
![]()
Since the call is to demdex.net, there is no ECID, but the demdex cookie will be included in the call, which is equivalent.
And now I am finally ready to explain how profile merge rules work!
Image from rawpixel.com