
Cookie-based destinations
23 Feb 2020 » AAM
As it happens very often, when I was about to write about cookie-based destinations, I realised that I had not covered the basics. So, I decided to postpone this post and write another one on how a DMP works at very high level. Now I can finally write about one of Audience Manager features.
Why cookie-based destinations?
As I progress in my career at Adobe, I am forcing myself to always start with the same question: why? I think I am quite solution-oriented, so, when I am posed with a problem, I immediately jump to the solution. However, in my trade, this is rarely a good idea. You first need to understand what the customer really needs, which is not always what he thinks he needs.
With cookie-based destinations, we have to do the same, start with the why. Why would we need them? What use cases are we addressing? Well, I can think of four:
- Personalisation. Before Adobe acquired Demdex, the typical integration between Demdex and Target was through a cookie. The DIL code would create a cookie, mbox.js would read it, extract the information, pass it as mbox parameters and you could then create segments in Target based on these mbox parameters. Audience Manager and Target are now integrated, so you do not need to use a cookie. However, if you are using another personalisation tool, this is how you would integrate the two. In fact, one of Adobe Target competitors used my blog as reference to explain how to integrate it with Audience Manager.
- Ad serving. If you serve ads on your website, you can pass to the ad server the segments a user qualifies for using a cookie, to serve the best ad. Even the AAM documentation explicitly addresses some cases, as the Open Ad Server.
- Testing. It is usually difficult to check whether you qualify for a segment. One simple solution is to create a test cookie-based destination and map the segments you are testing to it. Then, it is very easy to read the cookie and check whether your segment definition is correct. Do not forget to disable this destination after your tests, you do not want to create more cookies in your visitor’s browsers!
- On site activities. This is more a catch-all reason. From time to time, in your JavaScript, you may want to change the behaviour of your code based on what segments the user qualifies for.
You may find other reasons. In general, you first need to know why you are creating a cookie-based destination, before you actually create it.
In case you are not familiar with cookies, I recommend my blog post on the basics of cookies.
User Interface
I assume you are now sure you need a cookie based destination. Let’s continue with the how. In the AAM menu, select “Audience Data” > “Destinations” and, on the next screen, click on the “Create Destination” button.
Basic information
 This is the easy part:
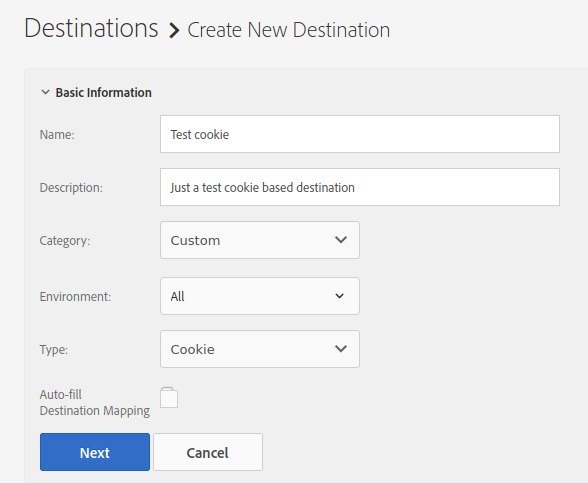
- Name. Give it a unique name.
- Description. Provide a more detailed description, so that, in 6 months, you can remember what this destination is for.
- Category. Leave it as “Custom”.
- Environment. The documentation says you should select “Browser”, although my tests with “All” also seem to work. YMMV.
- Type. “Cookie” (obviously!)
I will skip “Data Export Labels”, as this topic requires its own post, or maybe even more than one.
Configuration
 This is where it starts to get hairy:
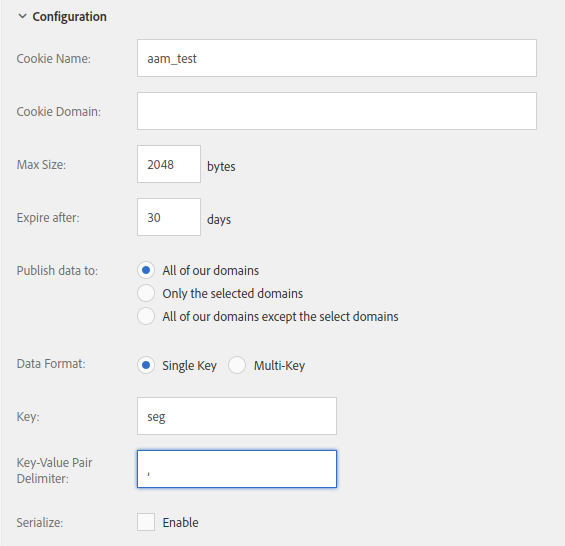
- Cookie name. Provide a unique name for the cookie. Make sure it is unique in your website. AAM has no idea if a developer has already created a cookie with the same name and will not warn you. To avoid issues, I recommend that you only use alphanumeric characters and the underscore (_).
-
Cookie domain. This is the
Domainparameter that will be used in JavaScript when creating the cookie. You may want to use it if you have multiple sub-domains and want to store the cookie in the top level domain. Leave empty if you do not need it. - Max Size. The expected maximum size of the cookie. Remember that browsers may trim it. It is only an issue if you plan on putting dozens or hundreds of segments.
- Expire after. Set the number of days, after the last time the cookie was refreshed, when the cookie expires. I still have to learn more about ITP, but it could well be that some browsers ignore this value.
- Publish data to. Here you select the domains where you want this cookie to be set. Only useful if you are managing multiple domains from the same AAM account and you only want this cookie in some domains, but not all. In case you are getting lost, check the official documentation.
-
Data Format. This parameter determines how AAM sets the cookie contents. You need to agree with your developers this format, as they will be reading the cookie and need to know this format. Or, if 3rd party software is going to read the cookie, this software will impose a specific format.
-
Single Key. The contents of the cookie will be an array of key/value pairs separated by the key-value pair delimiter. In all cases, the key will be the same. The key/value pair separator is always the equals symbol (=). For example: if the key is “seg” and the delimiter is a comma, the contents would look like:
seg=abc,seg=def,seg=ghi. -
Multi-key. The contents of the cookie will be multiple key/value pairs. The key-value pair delimiter is the character between key/value pairs and the key-value separator is the character between each key and value. For example, with key-value separator set to ‘=’ and key-value pair delimiter set to ‘,’, you would get something like:
seg1=abc,seg2=xyz.
-
Single Key. The contents of the cookie will be an array of key/value pairs separated by the key-value pair delimiter. In all cases, the key will be the same. The key/value pair separator is always the equals symbol (=). For example: if the key is “seg” and the delimiter is a comma, the contents would look like:
- Serialize. I would not use it, as it just makes things too complicated.
Save!
Mapping segments
Now you need to decide which segments you want to be written into the cookie. It does not make any sense to just put them all. Remember the cookie has a maximum size. Only add those that you really need as part of your use case.
When you click on the “Add Destination” button, depending on the data format above, you will get two options: to set only the value or both the key and value. In the example above, since I am using a single key, it looks like:
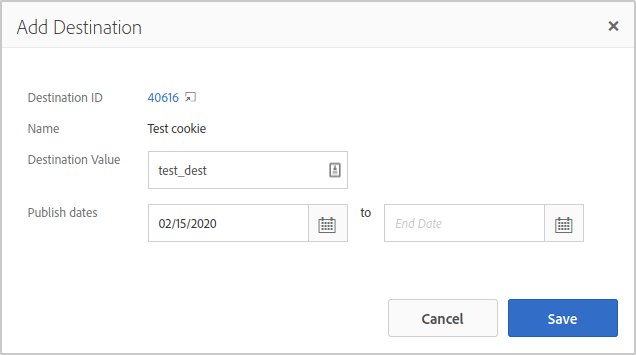
The “Destination Value” is what I expect to see in the cookie. So, continuing with the example, when I qualify for this segment, a cookie named “aam_test” will be created and its contents will be seg=test_dest.
Testing
Now that you finally have the destination set up, you need to let it “bake” for a few hours. Remember that the UI is a centralised server, but AAM needs to distribute the configuration to all DCS and this takes time.
The easiest way to test it is to navigate to the website and enable the developer tools. Then, you will want to do the needful to qualify for the segment. Once you know you should be in the segment, the first test you can do is to see how the Analytics call returns a JSON object with the cookie details:
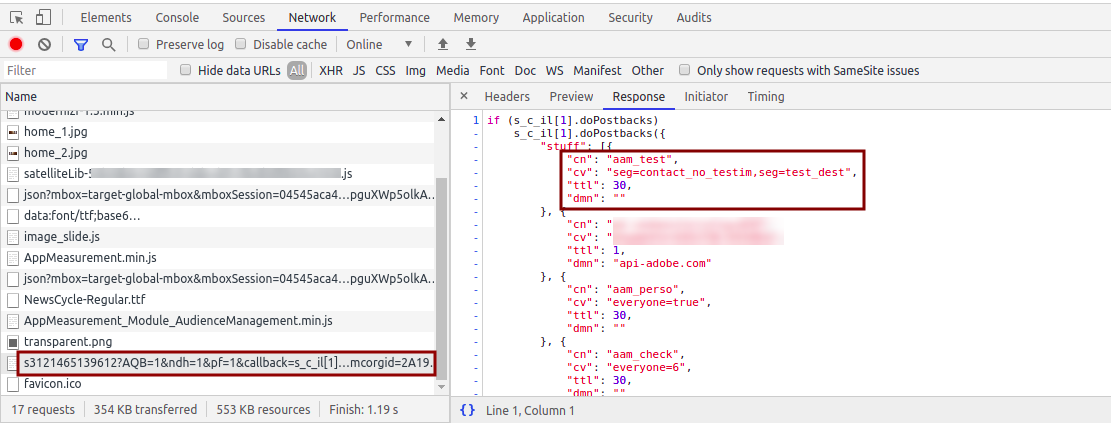
I can see the cookie name, the cookie value, the expiration and the (empty) domain. Finally, you will want to check that the cookie is created and has the correct contents:

You will notice that the cookie is URL encoded. You will need to decode it before you can read it. Decoding the previous example, you get: seg=contact_no_testim,seg=test_dest. In my example, this is exactly what I was expecting.
Let me know in the questions if there is anything that is not clear.