How to Add an App to Mobile Services
24 Sep 2017 » Mobile
After the introduction from my last post, this on will focus on how to add an app to mobile services. I know there are a lot of details to be configured when adding an app, so I will try to clarify the settings and guide you how to add your own app.
Before adding an app
Before you can add an app to mobile services, you need to plan a bit the report suite structure. In the mobile services world, an app is just a report suite with some special settings. Some points you need to consider:
- Separate each environment: development, staging, production…
- Combine iOS and Android in the same report suite or keep them separate
- Combine tablet and mobile phone in the same report suite or keep them separate
- Have all apps in the same report suite or create one report suite per app
My recommendation is to keep separate report suites per environment (development, staging, production…) but combine in a single report suite iOS & Android and tablet & phone. There is, thought, a limitation with push messaging, which I am not going to explain now. So, if you plan to use push notifications, the previous recommendation has to be applied per each pair of apps (1 iOS + 1 Android). Developing universal apps, for both tablet and mobile, will be very useful here.
The previous suggestion also plays well if you have multiple, differentiated apps. As you will have a version of each app for the main operating systems, you will naturally group the apps according to their purpose. This grouping will mean different report suites for different apps.
Once you have decided how to organise your report suites, you need to create them in Adobe Analytics. Then, for each of these report suites, you have to enable two settings: app reports and location tracking.
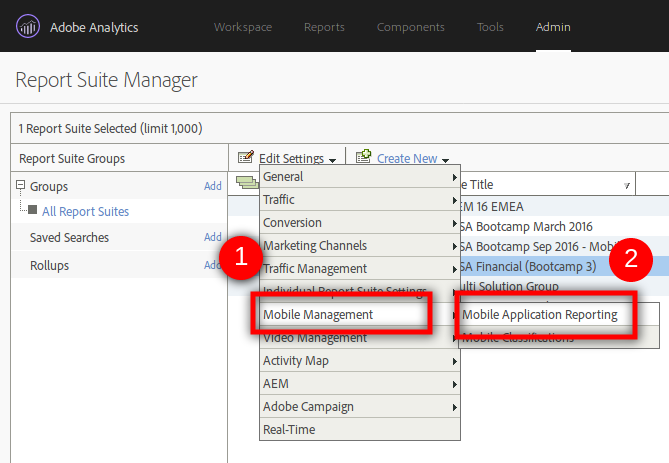
![]()
It is worth mentioning that all non-app specific metrics will always be available in the Adobe Analytics interface, just like any other report suite. You can choose which interface suits you better, depending on your reporting needs.
Adding a new app
We are finally ready to add the app to Adobe Mobile Services. Going back to the mobile services interface, you click on “Manage Apps” and “Add”:
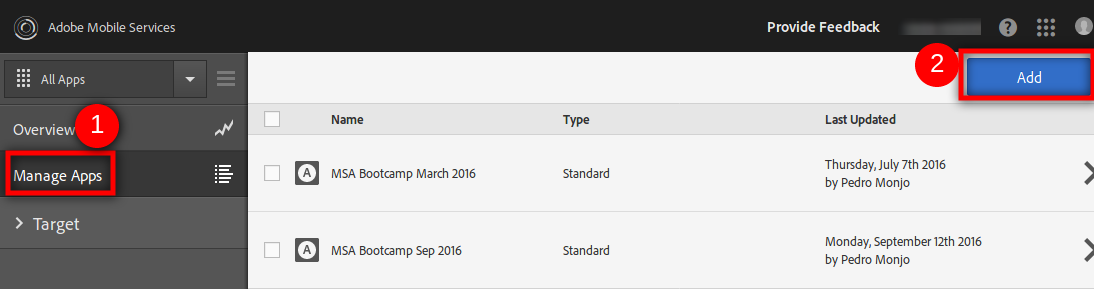
In the new screen, select the report suite, a square icon and set a name and description. For type, leave “standard”. Click on “Save” and… voila!, you have your new app added to the mobile services user interface.
Manage app settings
You access this page by clicking on the dented wheel next to the app on the dashboard. You will get a very long page, with a lot of details of the app. I will try to walk you through most of the settings. I will skip the more advanced features “Universal Links and App Link Options” and “Push Services”. Leave them blank unless you know what you are doing. Do not forget to save at the end.
 App Information
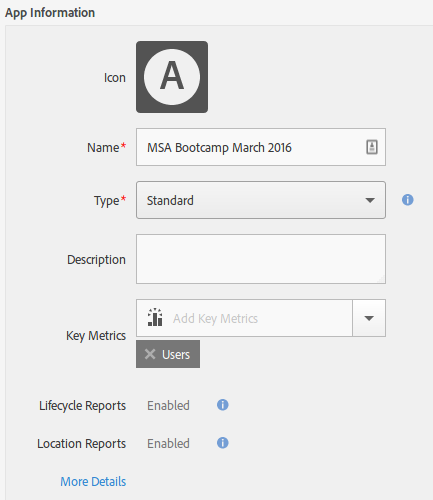
As you may easily get, these are the basics of the app:
- Icon, name, type and description are the same as when adding the app. Just in case you want to change any of the values.
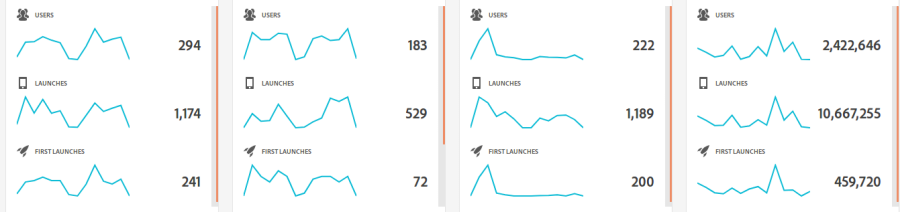
- Key metrics. This are the metrics that will show up in the dashboard.
- Lifecycle and location reports. Click on “Enable” if they are not enabled. It makes no sense to have them disabled.
SDK Analytics Options
This is the configuration for Adobe Analytics implementation of the app.
- Use HTTPS. While developing and debugging, you will probably want to disable it. In production, keep it always enabled.
- Backdate Session Hits. If it is enabled, it will date the information from the previous session sent when the app is launched again to the date of the previous session. Otherwise, the date will be the current date. I have never seen a reason to enable it.
- Privacy. Unless you have a reason to change it, leave it as “Send data until opt-out”.
- Session Timeout (seconds). If you do not know what to set, leave the default value of 300.
By clicking on “More Details”, you can see more read-only options. It is worth noting that you cannot change the report suite.
SDK Target Options
- Client Code. Your Adobe Target consultant or client care should provide this for you.
- Request Timeout (seconds). If you do not know what to set, leave the default value of 5.
If you want more information, I have already written a blog post on how to use Adobe Target with mobile apps.
SDK Audience Manager Options
- Analytics Forwarding. All new implementations should use this. Check with your Adobe Audience Manager consultant in case of doubt.
- Host. Only set it if analytics forwarding is disabled. This will be your *.demdex.net subdomain you use in your DIL code.
- Request Timeout (seconds). If you do not know what to set, leave the default value of 5.
SDK Acquisition Options
- Enable. I do not see a reason why you would want this disabled, so enable it.
- Request Timeout (seconds). If you do not know what to set, leave the default value of 5.
Visitor ID Service
- Enable. You should have it enabled in all your apps (and webs too).
- Organisation. Select your Marketing Cloud Organisation.
Server-side vs client-side configuration
After you have configured the app in the mobile services user interface, you might be tempted to think that you are done with the configuration. Some people think that the app will “automagically” get this configuration and will know what to do. In fact, this is not true. The app settings include both server-side and client-side configuration. Obviously, those server-side settings will be managed by Adobe in the background and you should not worry about them.
However, for the client-side settings, you need to use a JSON configuration file generated by Adobe Mobile Services. You will notice at the bottom another section named “App SDK Downloads”.

By clicking on any of the operating system links, you will get the latest SDK library for that operating system and a JSON file with the client-side configuration. The “Config File” link just downloads this JSON file. If you open this file in a text editor, you will see how the settings you have input are transposed into this file. This configuration file needs to be included in the app together with the SDK, to be able to apply in full all the previous settings. I will explain more details about the SDK in a later post.