
Mobile Apps Optimisation with Adobe Target
05 Jun 2017 » Mobile
Optimisation and personalisation in the Web is something all digital marketers do (and if you don’t, what are you waiting for?!). Web technologies allow a great deal of flexibility, whereas mobile apps are very rigid. This is probably the reason why mobile apps optimisation and personalisation still infrequent.
Let me clarify something before I move on. In this post, I am only considering native apps or, in the case of hybrid apps, only the native part of the app. Apps that are, in fact, a full-blown web in an app context, can use traditional web optimisation and personalisation tools.
Web vs apps
Without getting too technical, the technologies behind web and apps are completely different. In the web, with familiar HTML, JavaScript and CSS, you can write code to completely change a web page. In the case of Adobe Target and DTM, just by adding two lines of code to a web page, you can do whatever you like with it. On the other hand, native apps in iOS, Android or Windows use a variety of technologies (Objective-C, Java, C#), but they all have one thing in common: you cannot change the behaviour or the content of the app without the cooperation of the code in the app.
The main consequence of this last statement is that, in order to do any optimisation or personalisation activities in an app, you need a new app release. This might come as a shock to many, but there is no way around it. And in case you are thinking of changing your native app into an app that it is just a website, just check Mark Zuckerberg’s words on this topic.
This consequence means, in turn, that marketers and IT need to work very closely together. All of you need to carefully plan the releases, not only to include new features and bug fixes, but to add A/B tests.
Setup
As with any optimisation or personalisation effort, the first action is to identify which locations of the app are going to be tested. I am not going to explain this process, but it is very important that the app developer is involved in the conversation from early on. The main reason is that the developer will need to create both the offers in Adobe Target and the code in the app. In case you are wondering, these locations are what we call mboxes in the web.
Once the locations of the app to be tested are identified, you (developer) need to decide how do you want to receive the information from Adobe Target. My personal recommendation is to use the JSON format and this is what I will use in my examples.
Adobe Target calls in the Adobe SDK
I suggest that you start with the coding part. You will see why in a bit later. For this explanation, I am going to follow this code as an example. I am not an expert in Swift or Objective-C, so remember to verify this code. The next explanation must be repeated for each area that is going to be tested or used for personalisation.
Before you make any calls to Adobe Target, you will probably want to set some default contents. Therefore, in the worst case scenario, you have something to present to the user.
private func setDefaultContent(){
    let image = "https://domain.com/default_image.png";
    let title = "Title"
    let subTitle = "SubTitle"
    let ctaLink = "https://www.google.com"
    let ctaText = "Google is your friend"
    setContent(image,title:title,subTitle: subTitle,ctaLink: ctaLink,ctaText: ctaText)
}
However, this is not strictly necessary and, depending on the cases, it might be a bad idea. The reason is that this can cause flicker in the app: the default contents are very briefly shown, before the new contents are received from Target and displayed. Alternatively, you can delay the transition for enough time for Target to respond or fetch Target contents before the transition.
The request to Adobe Target is made of two parts: creation of the request with ADBMobile.targetCreateRequestWithName and invoking the request to Target with ADBMobile.targetLoadRequest.
var dictionary: [String : String] = Dictionary()
dictionary["anmboxparameter"] = "something"
dictionary["anothermboxparameter"] = "somethingelse"
let additionalMboxParameters = NSMutableDictionary(dictionary:dictionary)
let request = ADBMobile.targetCreateRequestWithName(
    "dma-mobile-mbox",
    defaultContent: "default-content",
    parameters: additionalMboxParameters as [NSObject : AnyObject])
ADBMobile.targetLoadRequest(request, callback: setContentFromAdobeTargetResponse)
For each of the locations of the app to optimise or personalise, you need to set a name. In this case, I am calling it “dma-mobile-mbox”. You also need to set a default content, which will be passed to the callback when the default content is selected by Target. The additional parameters are optional and only needed when additional segmentation is needed. If you have worked with Adobe Target for the web, this will look familiar to you.
Target calls are asynchronous so, only when then SDK has received the contents (or a timeout), the callback will be invoked:
private func setContentFromAdobeTargetResponse(entry:String?) -> Void{
    let data = entry!
    if(data==self.TARGETDEFAULTCONTENT){
        // No target response
    }
    else{
        dispatch_async(dispatch_get_main_queue(), {
            if(entry=="default-content"){
                self.setDefaultContent()
            }
            else{
                let dataFromEntry = entry!.dataUsingEncoding(NSUTF8StringEncoding, allowLossyConversion: false)
                let data = JSON(data:dataFromEntry!)
                let image = data["image"].stringValue
                let title = data["title"].stringValue
                let subtitle = data["subtitle"].stringValue
                let ctatext = data["ctatext"].stringValue
                let ctalink = data["ctalink"].stringValue
                self.setContent(image,title:title,subTitle:subtitle, ctaLink:ctalink, ctaText: ctatext)
            }
        })
    }
}
There are three cases in the responses from Adobe Target that you need to consider:
- No response, in which case, you need to decide what to do
- The default content, which is marked by returning the same value specified in the call to
ADBMobile.targetCreateRequestWithName - A JSON object with an alternative content, in which case, you will use it to modify the contents. Obviously, if you do not use JSON, a different data format will be returned.
If you need to create a conversion mbox, use ADBMobile.targetCreateOrderConfirmRequestWithName. If you do not know what I am talking about, ask your friendly marketer about it.
Finally, execute the code a few times before proceeding to the next section.
For your reference, here you have the documentation of Adobe Target in iOS and Android.
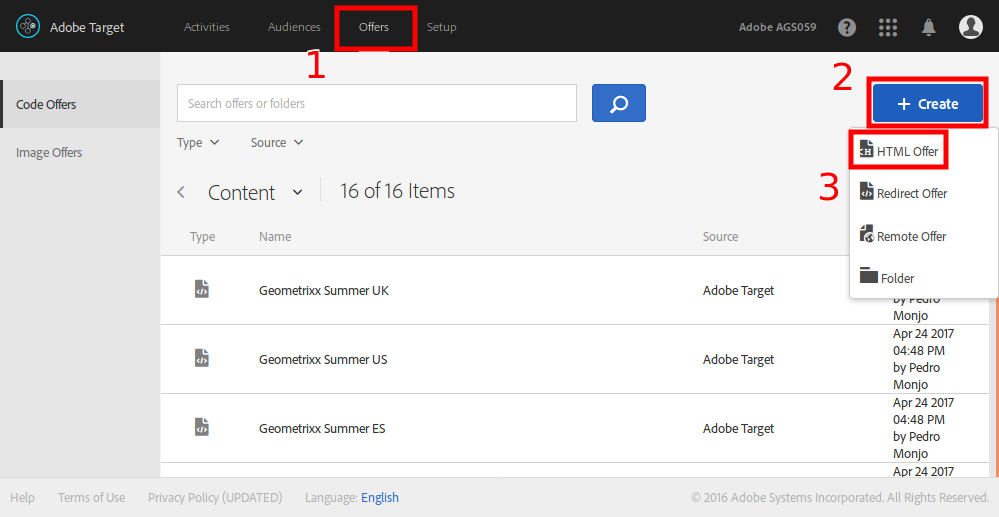
Offers in Adobe Target
Go to Target and create as many offers as options are going to be shown on all mboxes. In each one, set the JSON object that you want to receive. Do not forget to include default content.
To do that, you need to create an HTML offer:
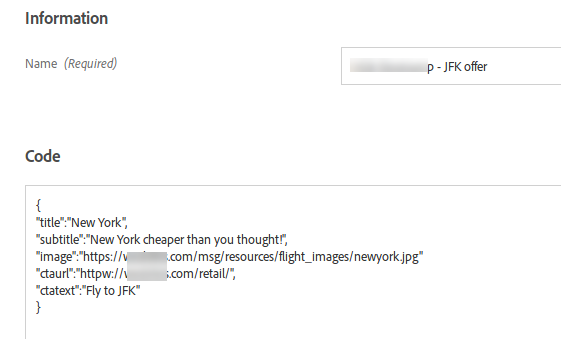
And populate the code with the JSON object. I know it sounds a bit confusing, but this is how it is. You also need to name the offer.
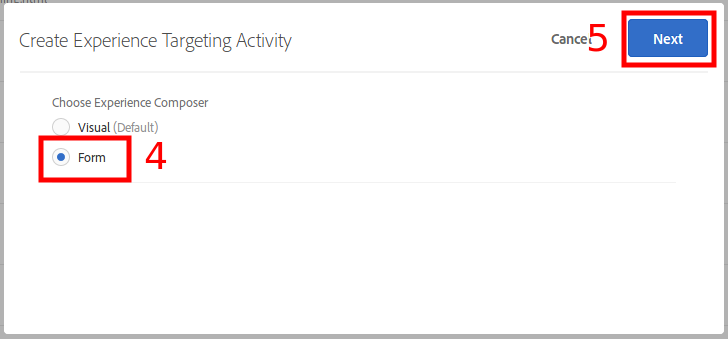
Activities in Adobe Target
The last step in Adobe Target is to create the activities. For obvious reasons, you cannot use the Visual Experience Composer to create the experiences, as this tool is only available for web. You need to select the form option.
Now is when you connect the mboxes with the experiences. On the “Create” step, you first need to select the location. For your mbox name to appear, Target needs to see it first in a call. This is why I recommended starting with the code, so that the mbox names are already available in the location dropdown. For each location and audience, you select what content should be send to the app. Choose “Select Offer”, to be able to select the right offer created on the previous step.

The rest of the process is the typical Adobe Target configuration setup, which is out of the scope of this post.