
Consent Management - Part II
14 Mar 2021 » Launch
This is the second part of a 2-part series on consent management. The first part was an introduction to the concept of consent management, where I explained what a Consent Management Platform (CMP) is, some legal implications and introduced Adobe’s solution. In this second part, I will show you how to configure the Adobe Opt In service feature in Adobe Launch.
For reference, this is how the Opt-In feature UI looks like in Launch:
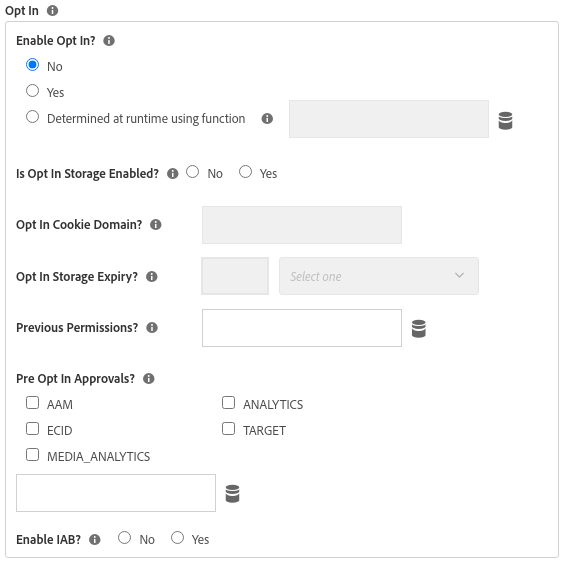
Remember that you find it in the ECID service configuration in Launch.
Enabling
Well, if you want to use it, you need to enable it. The typical case would be to select “Yes” under “Enable Opt In?”. However, there is a 3rd option. You can supply a data element, that returns true or false, to enable or disable this feature. I am not sure who would want to use it, but I guess there must be a reason why this option was added.
Permission storage
The next configuration parameter is “Is Opt In Storage Enabled?”. I need now to spend some time explaining what this parameter means and the two options that you have in this respect.
Let’s start with the meaning. I do not think it is a surprise for you if I tell you that the visitor’s permissions need to be stored somewhere. Once the visitor has submitted his preferences, there is no need to ask him on every page about them. In fact, I am pretty sure he will close the browser’s tab if we ask him 3 or 4 times. We still have to give him the option of changing them, though, but that is usually offered through a link in the footer of the website.
The next question is, where are these permissions stored? There can be two options: rely on the CMP built-in mechanism or use the Adobe Opt-In storage. They are mutually exclusive, so you need to chose one and stick to it.
CMP storage
If you use a CMP, it should come with its own solution for storing the permissions. This is usually done through a cookie or WebStorage. The CMP should offer an API to easily access the permissions, instead of you having to reverse engineer the implementation. Some CMPs even offer a Launch extension, which I assume should make it even easier to access. At the time of writing, there are, at least, 3 such extensions:
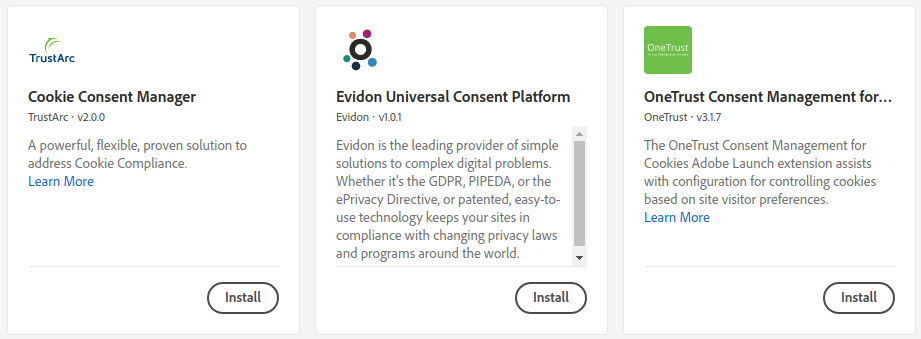
I have never tried them, though, so I cannot give you any advice on them.
The idea with this first storage option is that the Adobe Opt In functionality relies on the CMP. Using an extension or through Data Elements, you bridge the gap between the CMP and the Adobe Opt In service. In this case, you need to configure the following parameters:
- Is Opt In Storage Enabled? set to “No”.
- Opt In Cookie Domain? and Opt In Storage Expiry? should be disabled, so you just skip them.
-
Previous Permissions? should be set to a Data Element that returns the permissions selected by the visitor. I know that the word “Previous” may cause confusion; for me, it should just say “current”. You need to write some code or use the CMP Launch extension to generate a response in the format below. Obviously, you only need to provide those keys related to the tools you have. For a full list of tools, open a browser console and type
adobe.optIn.Categories:

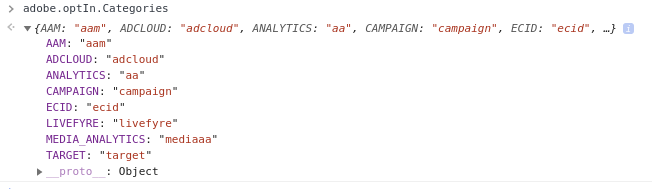
{
    'aam':      [true|false],
    'aa':       [true|false],
    'target':   [true|false],
    'ecid':     [true|false],
    'adcloud':  [true|false],
    'campaign': [true|false],
    'livefyre': [true|false]
}
- Pre Opt In Approvals? set to the tools that your legal department has told you that can be opted in by default. In other words, what Adobe tools can be enabled before the users provides his preferences.
First page, first visit
If you have been following me so far, you may have noticed that there is a minor conflict between “Previous Permissions” and “Pre Opt In Approvals”. In the first page load of the first visit you could have both parameters returning a value. According to the help, “Previous Permissions” takes precedence over “Pre Opt In Approvals”, so you need to take this into account. To keep things simple, you should do one of these two options:
- If your CMP offers an general configuration option to set default permissions and you have them available when the Adobe Opt In code runs:
- Make sure that the data element configured in “Previous Permissions” returns these default values.
- Do not set anything under “Pre Opt In Approvals”.
- If you prefer to manage the default permissions in Launch:
- Make sure the data element configured in “Previous Permissions” returns nothing before the user submits his preferences.
- Set the default opt-ins in “Pre Opt In Approvals”.
Adobe Opt In Storage
Let’s move on to the second option to store the permissions. As you can guess from the header, in this case, the Adobe Opt In feature will take care of the storage of the permissions. A cookie will be created and managed by the Adobe Opt In code. This is particularly useful if you have built your own CMP and prefer that the Adobe code takes care of the storage of the permissions.
The configuration for this case will look as follows:
- Is Opt In Storage Enabled? set to “Yes”.
- Opt In Cookie Domain? set to your domain.
- Opt In Storage Expiry? set to the amount of time you want this cookie to be stored, before it expires; if a user does not visit your website for this amount of time, he should be prompted again to submit his preferences.
- Previous Permissions? left empty.
- Pre Opt In Approvals? set to the tools that your legal department has told you that can be opted in by default; in other words, what tools can be enabled before the users provides his preferences.
Change to consent parameters
So far, I have explained how to store the permissions. However, there is a key part still missing: the selection or change of the preferences through the Web UI, as submitted by the user. You need to inform the Adobe Opt In functionality of the choices of the user. This has to be done every time there is a modification, be it in the first page of the first visit or when the user decides to change them later.
There are two reasons why this is important:
- If you have chosen the Adobe Opt In storage, to change the value of the cookie with the new preferences.
- To send any pending calls.
Let me elaborate on this last point. Let’s consider the following scenario, where you use a 3rd party CMP software:
- Visitor lands on your website for the very first time
- The CMP shows a message, prompting for consent
- By default, you have chosen to block ECID and Analytics calls; therefore, no tracking happens
- The user accepts all permissions
What would you want to happen at this moment? Personally, if it were my website, I would want the ECID service and Adobe Analytics to make the calls, which have been put on hold. This will allow me to track the first page view, the landing page, any query string parameters and the referrer, among other dimensions and metrics. I would not want to wait for the visitor to move to the second page of his visit, as all that information will be lost by then.
I am not sure what happens with Target, as I have not tried. Target also waits and fires the mbox call as soon as it is given permission, although it does not wait for the ECID to resolve (Thanks anpo for the information!)
If you are wondering how to send this notifications, keep reading.
Opt In Methods
The Adobe Opt In service offers a series of methods to interact with it through code. I will not explain all of them, only those more relevant. Should you need to interact with it, I suggest you review the documentation.
Notifications
Continuing with my explanation above on consent notification, there are 5 methods that you should be aware of. I have not tried the Launch extensions provided by the CMPs, so, you may not need to call these methods manually, as these extensions may take care of that. However, in the most general case, you will have to add code to invoke the following:
-
Approve all. This method tells the Adobe Opt In service that the visitor has accepted all the permissions:
adobe.optIn.approveAll(). -
Deny all. This is exactly the opposite method as the previous one:
adobe.optIn.denyAll(). -
Approve one. The visitor has approved one individual permission:
adobe.optIn.approve(<category>,true). -
Deny one. The visitor has denied one individual permission:
adobe.optIn.deny(<category>,true). -
Permissions complete. The visitor has finished configuring his permissions:
adobe.optIn.complete().
The first two methods are very clear. In most CMPs, you get a button to “approve all” and another button to “decline all”. So, if the user clicks on any of these buttons, you just need to call the corresponding method.
It gets more complicated when the user cherry picks his preferences. In this case, you need to call the 3rd or 4th method above for each category and, once you have made all these calls, you call the 5th method. The parameter <category> must be a value from the JavaScript object adobe.OptInCategories . For example, if a user accepts web tracking, but declines advertising and personalisation, once the user clicks on the “accept” button, you would call:
adobe.optIn.approve(adobe.OptInCategories.ANALYTICS,true);
adobe.optIn.approve(adobe.OptInCategories.ECID,true);
adobe.optIn.decline(adobe.OptInCategories.TARGET,true);
adobe.optIn.decline(adobe.OptInCategories.AAM,true);
adobe.optIn.complete();
Permissions retrieval
If you are coding your own CMP and you have configured the Adobe Opt In service to store the permissions for you, you will want to read them too. There are actually 3 ways to read these permissions:
-
Get all permissions. Just read the object
adobe.optIn.permissions. -
Query individual permissions. Call
adobe.optIn.isApproved(<category>), using the same categories as above. -
Retrieve permissions asynchronously. Use this method:
adobe.optIn.fetchPermissions(callback, shouldAutoSubscribe). Check the documentation to learn how to use it.
With all that, you should now be able to use the Adobe Opt In service in Adobe Launch.
Image by Gerd Altmann from Pixabay